


The latest version is here – and it’s packed with great new features!
- You can now lock exported data to make sure no one accidentally modifies it afterward.
- The system now gives you in-app notifications about absence requests and software updates – so you’ll stay up to date at all times.
- You can add, edit, and hide buttons for projects and work tasks, including follow-up entries and other selections.
- The Events view is now dedicated solely to viewing events.
- From the door control information, you can see the exact times when the doors will next automatically lock and unlock. No more guessing!
Let’s roll up our sleeves and go through everything!
Locking exported data
Wouldn’t it be great if no one could edit data after you’ve exported it to the payroll system? Just ask us to enable data locking for exported entries!
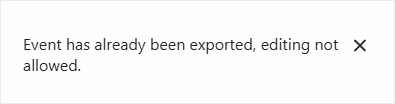
During data transfer, the system will ask if the data should be marked as exported. If the lock is enabled, the data will also be locked at the same time. If someone tries to edit or delete the data afterward, the system will block the action and notify that the data has already been exported.
If you want to lock events without exporting, you can simply right-click an event, shift, or person and select “Mark as exported” from the menu.
You can also mark data as unexported again by right-clicking it.
To do this, you need to have the Export data permission enabled in the Persons view.
In-app notifications
A handy new in-app notification feature has arrived! Click the small bell icon in the top-right corner next to your name to view:
- New, edited, and deleted absence requests, including changes to their approval status.
- Software updates.
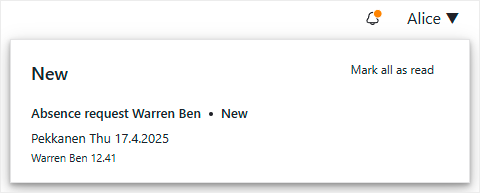
If you have unread notifications, the bell icon will show an orange dot – for example, when a new notification arrives.
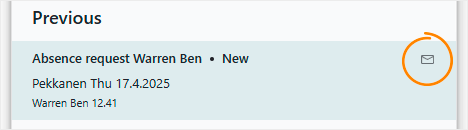
The dot disappears once you’ve read all notifications. If you want to return to a specific notification later, you can mark it as unread by clicking the envelope icon – the notification will then move back to the top of the list.
Absence request notifications
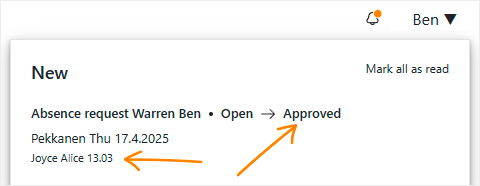
You’ll receive notifications about new, modified, or deleted absence requests, so there’s no need to check their status manually anymore.
Clicking the notification takes you straight to the request – except in the case of deleted ones.
The notification also shows who edited the request and whether the approval status has changed.
You can decide what kind of absence request notifications you receive. The main menu now includes a Settings section, where you can adjust your notification preferences.
![]()
In Settings, you can choose whether to get notifications only about your own requests or also about other users’ requests you have access to. Naturally, you can also turn the notifications off.
Software update notifications
From now on, all users will receive information about software updates. That way, you’ll know immediately when new features are available. You can view the update details by clicking the notification.
Notifications are available in Finnish, Swedish, and English – depending on your system language.
Adding, editing, and hiding project and work task buttons
Previously, you had to contact us if you wanted to add, edit, or hide buttons for projects and work tasks, their follow-up entries, or other selections.
Now you can handle it yourself, directly in the Settings, whenever it suits you. Just ask us to make projects editable and ensure you have the Settings permission enabled in the Person view.
This feature is especially handy if you often add or remove work tasks and projects, but their tracking structure remains relatively simple.
If your projects and work tasks stay the same year after year, it’s best to define them during implementation – or ask Deltabit’s customer support to handle it, especially if the structure is complex.
Work task and project settings
You can access work task and project settings from the Settings section in the main menu – just make sure you have the necessary permissions enabled.
The settings provide a clear view of all available entries for projects and work tasks.
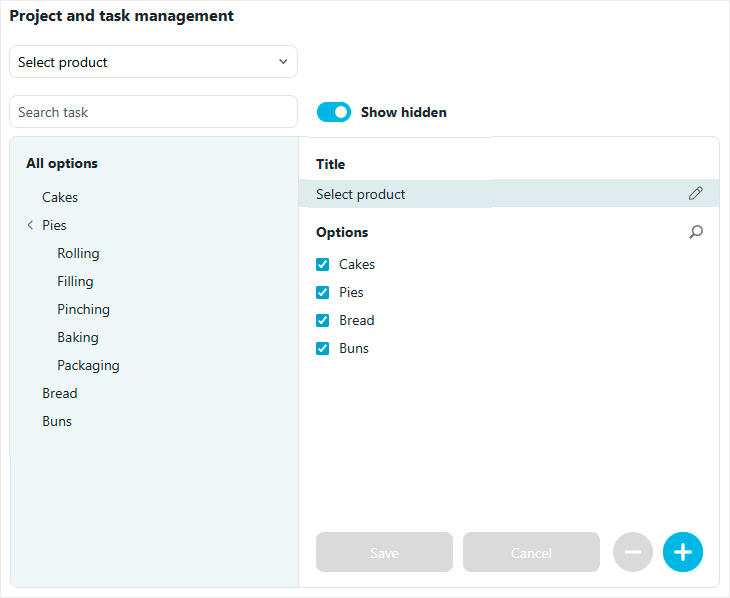
Navigating the view is easy. On the left-hand side of the start screen, you’ll see the full tracking structure, which helps you jump directly to the relevant section.
Use the plus icon to add new buttons to the existing structure.
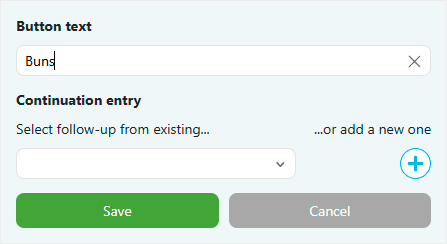
You can also add follow-up entries to buttons when multiple entries need to be recorded in sequence.
You can either use existing follow-up entries or create new ones. If certain follow-ups should always be included, you can set them as default.
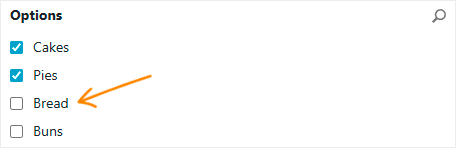
You can also hide buttons and their follow-up entries from the view – and bring them back when needed. The order of buttons can be changed easily by dragging and dropping.
If you want to permanently delete a button, the system will first ask for confirmation. Only hidden buttons can be deleted to avoid accidental removal. When a button is deleted, all related stored data will be removed as well.
Thanks to the handy search function, you can look up buttons and more. Editing is easy – just click the pencil icon next to the name.
To keep the view clear, you can choose to display only active projects by filtering out hidden ones.
![]()
Events view
From now on, events can only be edited and added in their respective tracking views: Work time events belong in Worktime tracking, and work task events in Work tasks and projects.
Therefore, the Events view is now intended for viewing events only.
Access control events can still be viewed exclusively in the Events view – and for security reasons, they cannot be edited.
Door control
Previously, you had to rely on memory, guess, or ask us to find out when doors would next automatically lock or unlock. Now, you can find the exact times directly on the Door control page by opening the door control details.
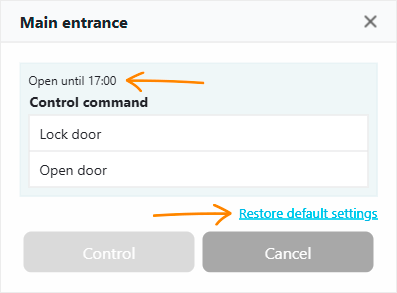
In the same place, you can also restore the door control settings to their default values if changes have been made to the automation and you’re not entirely sure about them.